How to Make Barefoot Sandals - DIY for running or everyday wear
- Carmen Fourie
- Aug 23, 2025
- 6 min read


You don’t need special tools, sewing skills, or shoemaking experience to create your own barefoot sandals. These are beginner-friendly, require just a few basic materials, and can be customized to your feet, your lifestyle, and your style preferences. Even if you’ve never made anything like this before, you can absolutely make these sandals.
They’re lightweight, durable, and amazing for your feet—designed to keep your natural barefoot movement while still protecting your soles. Best of all, they’re fun to make and completely adjustable to your own comfort.
✨ No sewing required.
✨ Beginner friendly.
✨ Great for your feet.
✨ Customizable to running or lifestyle wear.

Background
We’re a barefoot / barefoot shoe family and have been for many years. Up until recently, we always bought our shoes—most of what we wear are Vivobarefoot, and I even had my winter shoes custom made. But then we reached a point where we needed shoes that we couldn’t easily buy.
It started with Ian, my husband, wanting a pair of Earth Runner sandals. With the cost of importing them plus the tariffs right now, it just didn’t make sense. I felt a little bummed for him, but didn’t think at first that I could actually make him sandals.
That changed when I began looking into making soft leather shoes for our toddler (that how-to is coming soon—subscribe so you don’t miss it!). While working on that, I realized I could also try my hand at creating barefoot sandals for Ian.
The pair I’m sharing here is a lifestyle version that I made as a birthday gift, but I’ll also share how I’ll adapt the design for running in the next round.
A Note on Tarahumara-Inspired Huaraches
The design of these sandals is inspired by the Tarahumara (Rarámuri) people of Mexico, who are known for their incredible long-distance running ability. They traditionally make simple huarache-style sandals with minimal soles, held to the feet with thin leather straps.
This ultra-minimalist design has stood the test of time because it allows the feet to move naturally while still offering protection—exactly what barefoot enthusiasts like us are after. My DIY version borrows from that concept but uses materials I had on hand.
✨ There’s also a DIY barefoot sandals video you can watch to see exactly how I made them step-by-step.
For inspiration, I leaned on two fantastic guides:
What You’ll Need
Sole material: I used 3mm rubber crepe (would have loved a darker color, but this was what I found)
Leather or canvas for the upper: I used soft leather (leftover from my toddler’s shoes), but organic cotton canvas would also be a great choice.
Laces: About 1.6m per shoe. I used 3mm leather laces, but thicker is better for durability.
Good scissors that can cut through leather and crepe
Shoe Goo (or strong shoe glue)
Washable fabric/chalk marker - the blue one I used & the white chalk one
Affiliate Disclaimer: Some of the links in this post are affiliate links, which means I may earn a small commission if you choose to make a purchase—at no extra cost to you. I only recommend products I genuinely believe in or use myself.
Step-by-Step: Making Barefoot Sandals
Step 1: Trace Your Foot

Place your foot flat on paper, weight evenly distributed.
Trace the outside of your foot and mark toe details.
While tracing, mark where you want your lace holes in relation to your toes and foot bones (see the lace image below).
Tape the paper down if needed for accuracy.
Tip: Bigger is better—you can cut away excess, but you can’t add back.
Lace image

Step 2: Cut Out the Template
Cut around your tracing, leaving at least 5mm outside the foot shape for lace holes.

Step 3: Mark Lace Holes
Carefully mark where each lace hole will go.
You want the holes close enough to the foot so the laces actually hold it securely—otherwise, your foot will slide around.
Unlike barefoot closed shoes where extra toe space matters, sandals rely on tight strapping for natural movement without slipping.

Step 4: Transfer to Sole
Place your paper template on the rubber crepe. Clip or tape it down.
Cut out the sole.
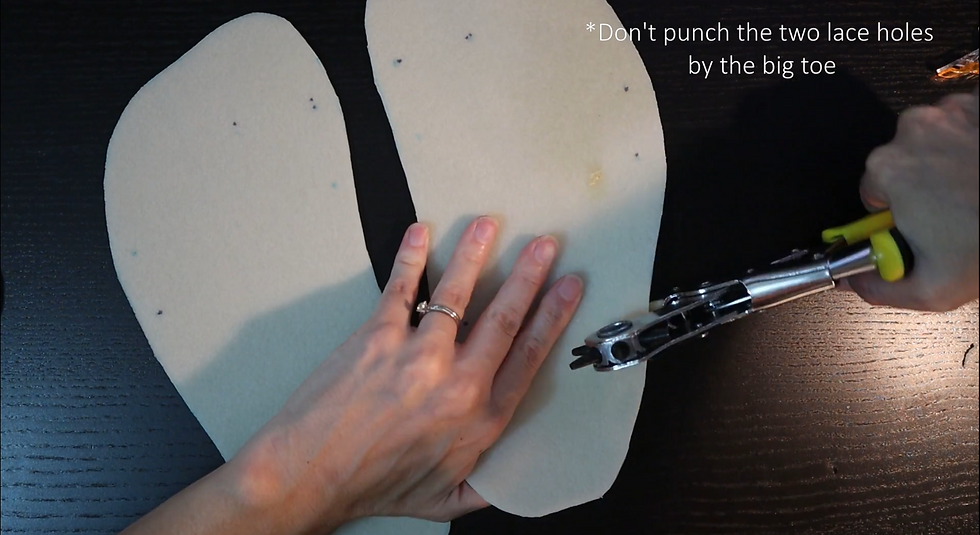
Mark the lace holes and test punch a few on scrap material to find the smallest hole that fits your laces.
Important: Don’t punch the two big toe holes (#1 & #2) in the sole—only in the leather later.
Also important: Place the foot on the rubber crepe with the lace holes marked to confirm where you want the holes before punching them in (we moved some holes).
Step 5: Cut the Leather Upper
Using the rubber crepe soles, trace onto the leather, leaving extra around the edges (I used the white marker for this).
Mark all the lace holes - especially lace hole #1 and #2. These will only be made through the leather and not the sole, where all the other lace holes will be through both the leather and the sole.
I used the paper outline from earlier to make lace hole 1 & 2, since we didn't punch those holes in the rubber crepe.
Cut out the leather piece, slightly bigger than the sole—you’ll trim later.

Step 6: Punch Toe Holes
Punch only the big toe holes (#1 & #2) in the leather.
The laces will sit under the leather by the big toe but won’t go through the sole.
Step 7: Prepare Laces
Cut two laces, about 1.6m each.
Lace through hole 1 & 2 with the lace going under the leather and the laces coming out on top of the shoe.
From lace hole 2 you will need at least 60cm lace (but more is better) - check the lace image above.
Make sure the lace lies flat and untwisted. This first lace will be glued to the sole and fixed in place.

Step 8: Glue Leather to Sole
Apply Shoe Goo (or your glue) to both the sole and the leather upper (I learned this the hard way—don’t just glue one side).
Clip the two layers together and press firmly.
Stack some heavy books on top and leave overnight.
THE NEXT DAY
Step 9: Trim and Punch Remaining Holes
Once dry, trim away the extra leather.
Punch the remaining lace holes using the rubber crepe holes as your guide.
Step 10: Lace the Sandals
Here’s the lacing path I used (watch the video to follow visually):
From hole 2 → 3 → 4
From hole 2 to 3 go over the shoe. Enter lace hole 3 from on top of the shoe. From hole 3 to 4 the lace is under the shoe. Go through lace hole 4 from the bottom of the shoe to the top.
From lace hole 4 go over the shoe to lace hole 5, but enter lace hole 5 from the bottom of the shoe (go around the outside of the shoe and enter the bottom of the hole and pull through the top).
Place your foot in the shoe for the remainder of the lacing.
Loop the lace around the lace 3 times (the lace that came from hole number 4)
Lace around back of the foot → into the bottom of hole 6
Do the same as you did for hole 5 and make 3 loops. Stop here with this lace.
Pick up lace from hole 1 → into hole 7 → around the sole, enter in through the bottom and pull out the top - and loop once before taking this lace across your foot to meet the other lace to tie.
You can wrap this lace around your ankles once or twice or cut it shorter.

Step 11: Adjust and Fine-Tune
Try them on and walk around.
Mark any areas to trim further or adjust the lace placement.
How They Turned Out
Ian has been wearing them more and more. He loves the ground feedback while still having his feet protected. They feel light, simple, and secure—exactly what barefoot sandals should be.
I’ll be making him a running-specific pair next (with sturdier laces and slightly different lacing setup), but for everyday wear these have been perfect.
Closing Thoughts
These barefoot sandals turned out even better than I expected. Ian has been wearing them more and more, and he loves the ground feedback without losing protection. They’re simple, functional, and comfortable—exactly what we wanted.
The best part? Anyone can make these. You don’t need to be “crafty,” own special tools, or know anything about shoemaking. If you can trace, cut, punch holes, and glue, you can make your own pair.
So if you’ve been eyeing barefoot sandals but aren’t ready to invest in expensive imports—or if you just love the idea of customizing your own shoes—give this project a try.
And if you do, I’d love to hear how yours turn out! Share your experience and any tips you discover along the way so more people can join the DIY barefoot sandal journey.
✨ Don’t forget to watch the full DIY video for the demonstration.
Credit for the inspiration and what I used to make these shoes:
Disclaimer: This DIY project is shared for educational purposes only—I am not responsible for any injuries or damages that may occur while making your sandals. Work slowly, carefully, and always prioritize your safety.


Comments