How to make a Felt Pear Step by Step
- Carmen Fourie
- Apr 8, 2025
- 9 min read
I made two felt pears for my Hungry Caterpillar Sensory Table Project and in this blog, I am going to show you, step by step, how to make a felt pear (and customize it to resemble your pear preference).

Beginner friendly! I was a super beginner when I made these pears. As you can see the two pears look different, because I learnt from the first one to make the second one more like I wanted (but my husband likes the first more bumpy looking pear, so I kept it as part of the project).
If you are here to make more food than just a pear, or you also want to do the Hungry Caterpillar Project - the first felt food item I made was the first food the caterpillar eats - an apple.
If you know the story, the caterpillar eats 1 apple and then 2 pears, and the list goes on.

Table of Content
What you'll need
Felt Fabric Sheets - I have linked the ones I purchased and used for this project.
Thread (brown and green) - I like to thrift thread whenever I see it in the thrift store because projects like this require many different colors. If you like the effect of a thicker thread for felt projects, you can use embroidery thread. I used normal thread.
Plain white paper - Scrap paper is fine. It is to draw the outline of the parts before cutting the felt.
Pencil - Any pencil will do. It is for drawing the outlines of where to cut.
A sewing needle
A doll needle - If you are unfamiliar with a doll needle (I was when I started this project) it is a large sharp needle that can go through large items (like dolls). I have linked the very affordable pack I purchased with 38 different pieces.
Scissors - I recommend having normal scissors for the paper and fabric scissors for the felt, but fabric scissors are not necessary. Normal scissors can cut felt just fine, it is just easier to cut felt with fabric scissors. I have linked the ones I use.
Glue - any cheap glue stick will be perfect. It is to stick the paper to the felt to cut out the felt. You do not want it to stick well at all.
Fill / Stuffing - I am usually someone who goes for all natural, but to make this project and learning affordable I went to a polyester fiber fill. I have linked the one I bought. I did buy 6 packs because that was the most affordable per pack.
Optional: Sewing machine. I made this pear by hand, but because there are so many food items to make, I changed to using a machine when I made the oranges.
Note: If you would like to make the pear using a sewing machine to speed up the process, you can follow this step by step and see where I recommend using a sewing machine and you can also have a look at my felt oranges (link coming soon). The felt oranges are made almost exactly like the apple (with different colors of course), but I used a sewing machine instead of making them by hand.
Starting point

The first step is deciding how big you want your pear to be.
Since my felt pear was for my Hungry Caterpillar Project, I needed to make sure it would fit through the mouth, but also, I wanted the items to be large enough to be safe for a toddler to play with mostly independently. I safe mostly independently, because I choose to still observe my toddler playing for safety reasons, but I don't want to hover or interfere much.
I also wanted the pear to be more or less to scale and represent the real food.
Free hand draw the pear body outline
Based on the size I wanted; I free hand drew the pear body outline that you see below. I don't think it needs to be perfect, and I think it adds to the character and realness of the item for it to not be a perfect shape.
This is the outline for the more bumpy looking pear

The other pear outline

Tips for creating the outline of the pear
As you can see in the first image, I line to draw straight lines to assist with the two sides being more or less symmetrical. For a more "bumpy" pear you make the top and bottom parts wider and for narrower pear you have less curvy lines and a narrower pear outline.
You can download my pear body outline outline:
Notes: This isn't a perfect drawing because I free hand drew it, but it will turn out the same size as my pear if you use it. The paper is Canadian & US standard paper size (8.5 x 11 inches). Therefore, I recommend printing it on that size paper for the size to come out the same.
How to cut the felt
Pick a green color felt sheet that you think looks good for your apple.

I read a few blogs when I decided to start making things with felt on how best to cut the shape you want from felt. I saw a few different techniques recommended and I found the one that I think works best every time. Cheap glue stick.
Cut the paper pear shape out and stick it very lightly using a cheap glue stick. Only stick it well enough for it to stay on. Don't bother sticking down all the sides.

For one pear you need 6 pieces of the same size. I like to cut out a rectangle first and then cut out the exact shape afterwards.


I recommend only sticking the paper on one of the pieces and then layer them to cut out the others. I did 3 at a time, but you can do however many you feel comfortable cutting through at once.
Once you've cut out the shapes you can pull the paper off. I recommend using very little glue to stick the paper to the felt.
Now that we have all our pieces, we need to sew them together to make the apple.
Sewing the pear
Pick a green thread to use. Since I thrift my thread, I used whichever green color matches the felt best. I am not overly concerned with this project being perfect. I think it adds to the character to have imperfections.
Optional adjustment: If you like the look of visible thread that you see in many felt projects similar to this one - you can use embroidery thread (it is thicker). I have the linked the embroidery thread I used for other felt food items.
Another optional adjustment: You can sew this part using a sewing machine. Use the same concept of putting the pieces together and sew with a machine for it to go faster.
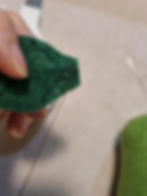
How to sew the pieces together
Hold two pieces together like the image below.

Hand sewing: We are going to use an overcast stitch. I linked a video you can use to see how to do it, or you can follow my written instructions.
Cut a thread piece that you guess is long enough to sew up the side of the pear (leaving a bit at the top and bottom of the pear).
Tie a double knot in the bottom of the thread.
Lay two pieces over each other. Like in the photo above.
Start working a little bit into the pear (see photo below). We are leaving the top and bottom open for now.
Go in the one side, pull out and go over and go in the same side that you went in to begin with. Always go in the same side.
The part that is on the outside now will be the inside of the pear, therefore, unlike in the video I linked you do not need to start by hiding the knot. The knot should be on the outside.
Remember to leave the top and bottom open for now. It makes it easier to put everything together.
Since I am making this for a toddler, I need mine to be durable and therefore I did many stitches quite close together.
Once you get to the end (leaving the top open) you can pull through and tie a knot to secure it.
Repeat the above for the remaining 4 pieces - so sewing two pieces together x 2.
You will now have 3 pieces that we want to sew together.

The important thing to remember when sewing them together is that you want the stitches to be on the outside.
Sewing the pieces together
When I did the pear, I kept the bottoms open (as per a recommendation I saw on a blog), but having now made several fruits I would recommend sewing them closed at the bottom in this step to save time (especially if you're machine sewing). I didn't find it difficult to turn it inside out, nor did I find it difficult to attach all the pieces. I do, however, still recommend you keep the top open, because you need to add the stuffing.


Once all the pieces are attached and the bottom is closed. You can turn the pear inside out.

Now it is time to fill the pear!
Using your stuffing, fill the pear.
Sew up a bit of the top and then fill up the pear some more until you reach your desired firmness.

Now sew the top closed.

Making the stem
For the stem I simply hand cut an irregular quadrilateral shape from brown felt (I did not draw it out on paper).

Then get some brown thread to sew the sew up.
Fold the brown felt to the desired thickness that you would like for the stem. Mine is has 3 layers.
Use the same overcast stitch that we used for the pear and sew up the side. To make it neater hide the knot inside the stem by inserting the needle into the middle of the stem layers rather than from the outside.
I recommend sewing it from top (the wider part) to bottom and then leaving thread to attach it to the leaf.

Now cut a 4-point star from brown felt.
I also free hand cut this shape rather than drawing it out on paper. I find the easiest way to do this is to cut a square and then cut diagonally twice on each side (cutting out the triangular shapes you see on the sides).
This shape is going to be the bottom part of the apple.
Once this is done, make the leaf.
Making the leaf
You can use my leaf design in linked in my Felt Apple Blog or draw your own leaf shape.

Stick the cut-out leaf shape to your desired green felt.
Cut out the leaf from the felt.
Optional step: I sewed some veins onto the leaf to give it a bit of detail. I used a running stitch for this.
Now that you have your stem, the bottom of the pear and the leaf - we can attach them as our final step.
Attaching the final parts
I recommend attaching the stem to the leaf using the leaf over thread from the stem. This makes it easier to work through the apple.
Then swap out your normal needle for a doll needle that is large enough to go through the pear.
Attach the leaf and stem to the top of the pear and the bottom brown piece to the bottom. Use the doll needle to work through the pear to each these parts.

Pull a little bit as you do this to form the indent shape of the pear. Work through the pear several times by inserting the needle through the one side and removing it on the other side and then inserting it from the same side you removed it to go to the other side.

Once you're happy with the indent and that the stem, leaf and bottom are secure enough tie a double knot or stitch a knot at the top and attempt to do this in a way that hides it between the leaf and the stem (although I don't think it is a major issue if this is visible).
Now your pear is complete!

I have also made pears, plums, strawberries, oranges and other food items as part of my Hungry Caterpillar Project.
Check back in periodically as I upload the details of all of those.
Thank you for joining me in making this adorable felt apple! I hope you had fun and feel proud of your handmade creation. If you enjoyed this project, be sure to check out more craft ideas on the blog. Don’t forget to share your finished pear with me—I’d love to see your work!
Happy crafting, and see you next time!
If you like it, please Pin it to Pinterest.


